Entries in wildcrafting (8)

Saturday
Nov242012

where the wild things are. the blue pearl.


One afternoon, a couple years ago, around a tiny fire outside their farmhouse in Southern Vermont, Les Hook and Nova Kim cooked up some wild mushrooms we had gathered that morning nearby. In a  large cast iron pan, they seasoned them with nothing more than a little butter or olive oil and some salt and pepper. It had just begun to snow steadily when we set out to gather. Large fat flakes  floated around us amd landed on our eyelashes.Les pulled over in his red Subaru, flashers glowing in the wild flurry of white. He deftly put up a twenty-foot ladder against a slippery maple tree and quickly climbed up. He pulled of the biggest Blue Pearl Oyster Mushrooms I have ever seen off that tree. We drove back to their place and lit the fire. It was then that Nova told us about her non-turkey, perfect for vegetarians on turkey day or for any feast any time of the year for that matter. You must start with a large fan of a mushroom, as you can see from the photo it kind of sweetly resembles a turkey's tail! Though I have roasted many a mushroom from them, it took me two years to get to this post. I asked Nova to save me a large Blue Pearl that I would pick up from the New Amsterdam Market. Luckily my snail mail reached her in time and I was able to get a beauty from them the Saturday before Thanksgiving. I kept in a paper bag on my fire escape until cooking day. Now I know I have sung their praises before but people, if you have not been to the market on a day when they are there then you are SERIOUSLY missing out. If you are interested in finding out when The Vermont Wild Food Gatherer's Guild will be in town go to The New Amsterdam Market website and check the vendor and calendar listings! They always have something special and if you have never been to the market then what are you waiting for? It is every Sunday from 11-4pm.

Back to the mushrooms...

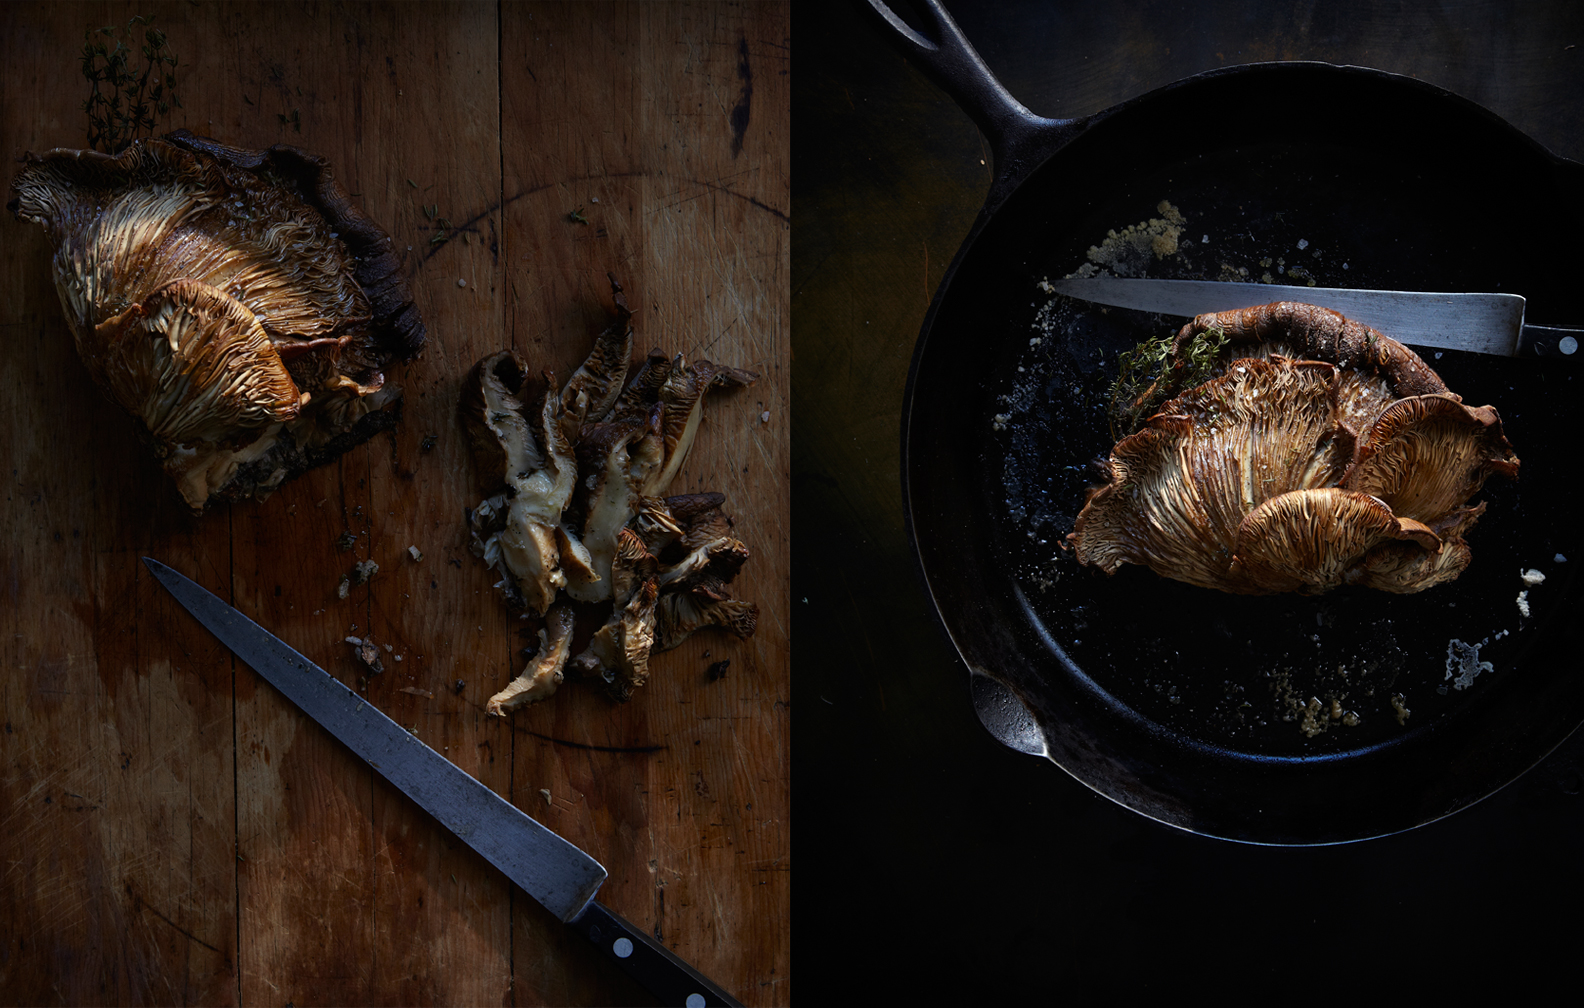
The mushroom I got from Les and Nova was held together by a stretch of bark. I left the piece of bark on the mushroom while I roasted it.

I brushed the mushroom with a generous amount of olive oil and sprinkled it with French sea salt cracked black pepper and thyme.

I put in my largest Cast iron pan...this was a BIG mushroom 14 inches across at least. I threw it in the oven at 350 degrees for a slow roast and when it started to brown at the edges I put about a 1/4 cup of water in the pan and covered it with tin foil to add a little more moisture. Mushrooms are essentially like sponges so they soak up all that moisture. I may not have needed to do this if I had roasted it right away but since I had waited a few days I thought it might help to add the additional moisture.. I took the tin foil off for the last five minutes or so of cooking. I can't give you a specific cooking time because it depends on how big or small the mushrooms are that you are roasting. So use your intuition. You want it to be moist and almost meaty when you slice it.

We loved this so much that we could almost forego the turkey next year and just eat this!

It was really good with gravy... 


Thank you Nova for this brilliant idea!


Roasted Wild Blue Pearl Mushroom Tail

Set your oven to 350 degrees 


1 large Blue Pearl Mushroom fan approx 12-14 inches in length

1/4- 1/2 cup olive oil brushed and drizzled on the mushroom

Seas salt to taste

Cracked black pepper to taste

Sprigs of Fresh Thyme

Gently brush any dirt or debris off the mushroom with a small mushroom brush or a small pastry brush

Place the mushroom upright in a large roasting pan or cast iron skillet

Brush and drizzle with olive oil. Mushrooms really soak it up so be generous with your application.

Sprinkle with sea salt and cracked black pepper

Add some fresh thyme leaves and a sprig or two for looks


Place in the preheated oven and roast for 15-20 minutes depending on the size of our mushroom.

Put about a 1/4 to 1/2 cup of water in the pan and cover with tin foil

When the water is all evaporated the mushroom will be done. 

Uncover for the last five minutes or so.

The mushroom should be moist and easy to slice along the grain.


Cooking time really depends on the mushroom size so keep and eye on it!@ You don’t want it to be too tough!!!


As always, a word of caution where wild mushrooms are concerned. Leave the gathering to an expert!!


Thursday
Jun072012

where the wild things are no.18. spruce tip honey and other bits.


A few years ago, an Austrian friend gave me a jar of spruce tip honey he had made in a big pot in his yard, over a fire, upstate. I was fascinated by the idea. He told me that it is easy to make a spruce pine or fir tip syrup from the young green tips of the spruce tree, fir or pine tree.

The spruce tip syrup strangely tastes of wild strawberries and citrus with just a hint of pine.  This is strange I know, but odd and beautiful at the same time!

I had planned to make it the following year but time slipped by and I found myself upstate at the wrong time to collect the young spruce tips. This year, however I was determined to make it! A forager friend and supplier, Evan Strusinksi, who collects for many well known chefs, sent me some spruce tips he collected in Southern Vermont. Simultaneously, we gathered a big batch of our own from upstate. So with a huge pile of spruce tips I set to work to make the mysteriously beautiful syrup! Spruce tips can also be used in various recipes; many chefs are using this wild ingredient on their spring menus. A little on line research came produced some quick shortbread, salts, pickled spruce tips and other interesting uses. So far, I have only had time to make the syrup but I have a big bag of tips in my refrigerator and they seem to keep quite well for a long time so perhaps I will get around to a bit more experimentation in the coming weeks.

Spruce, pine and fir tips are all edible and can be used to make syrup. They are very high in vitamin c. I imagined the syrup would be good on with seltzer, or in a cocktail mixed with a little gin and soda, on pancakes or in tea or as some research shows, it makes for a great spoonful of vitamin c to ward off and alleviate colds and sore throats! It seems like the perfect all around staple for a  fall/winter pantry. In some parts of the country it is too late to pick the young tips but if you are lucky and you hurry you may be able to set a jar aside for winter use., You  will want to pick the tips young because the resin qualities increase as they mature.

I found that with most things there were various techniques out there for making this syrup or honey as some call it.

I ended up going my own way because the jar that my Austrian friend had given me was quite dark in color and quite thick as opposed to the clear syrups I was seeing on line.

This recipe is really simple. I went with equal parts sugar and spruce tips and added a little extra water.

I combined all three and brought the tips and the sugar water to a boil making sure not to burn it or over boil the pot. I stirred constantly for 5 minutes or so to make sure all the sugar was dissolved. I then reduced the heat to a simmer and let it cook down slowly for three hours until it was a beautiful rose color and a little bit syrupy. It thickens quite a bit when cooled.

I then strained the tips out through a sieve and discarded them. I jarred the syrup in a sterilized quart jar and refrigerated it for later use. From what i have read on line, this syrup will last up to 4 months or longer if refrigerated.


See the below links for some interesting recipes found on line or check out The Wild Table by Connie Green for a salt recipe and a great spruce tip vodka. As with any wild food make sure to properly identify it before cooking with it or consuming it!

I used a different method to make mine but there is some interesting inspiration here.

http://medcookingalaska.blogspot.com/2008/06/how-to-harvest-spruce-tips-with-recipes.html

http://honest-food.net/veggie-recipes/sweets-and-syrups/spruce-or-fir-tip-syrup/


SPRUCE TIP SYRUP/HONEY

5 cups spruce tips

6 cups water

5 cups sugar


Method

Coarsely chop spruce tips

Combine water, spruce tips and sugar in a large pot.

Bring to a boil stirring constantly for five minutes.

Reduce heat and simmer for an hour or so on low or until the syrup thickens to your liking.

The color will be a light a rose. 

Remember that the syrup will thicken as it cools, so you may want to test a spoonful by letting it cool to check desired consistency. If you over boil it and it becomes too thick, you can add some water to thin it down, but the color will end up be a darker honey color as opposed to the rose.

The longer you simmer it the thicker and darker it will become.


Thursday
Apr052012

where the wild things are no. 14. nettle and ramp butter.

I have declared it nettle week in our house. So, while shooting a job at our place yesterday, I decided some nettle snacks were in order. We roasted some ramps with olive oil and sea salt and slathered some finish rye bread with some homemade nettle and ramp butter and topped it with the roasted ramps. It was the perfect afternoon treat, maybe the most perfect sandwich ever!

Recipes to follow on the weekend! (BUTTER RECIPE COMING SOON!)


Roasted Slightly Charred Ramps


1 bunch ramps

olive oil

sea salt

cracked black pepper


Preheat the oven to 350 degree.

Rinse the ramps under cold water to remove any dirt or debris.

Gently peel back the  lower outer most layer of the ramp and discard. Sometimes if the roots are on the ramps the outermost layer can be a bit transluscent and slimy. This is what you want to get rid of!

Cut the hairy root ends off the cleaned ramps and discard

Pat the ramps dry with a paper towel and lay them out on a roasting sheet. Thye can overlap one another.

Drizzle them with  extra virgin olive oil and sprinkle with sea salt and cracked black pepper.

Roast the ramps until just tender. 12-15 minutes at the most. Some of the leaves will brown and crisp a bit but don't worry! They still taste fantastic even when a bit charred!

Serve them with scrambled or poached eggs or on buttered toasts. If you feel iinclined and you pobably will; eat them straight off the baking sheet because they are just that good!


Thursday
Jan052012

where the wild things are no. 9. wild pantry


The first time I saw mushrooms drying in great abundance was in Northern China in the Shanxi Provence. We stopped for some tea at a tiny morning market where the women had piles of wild mushrooms laid out on cloth drying in the morning sun. They had collected the mushrooms from the peaks of the Wutai Mountain, a luminous, foggy, pine and temple covered wonder. Though i don't speak their language, they managed to explain to me perfectly their continuous pilgrimage to collect the mushrooms from the mountain during the different seasons. I will never forget it, it was such a beautiful moment. I dried many wild mushrooms in the summer and fall of this year inspired by those women. It was my first time doing so and I am really happy with my stockpiled pantry of little treasures. Wild mushrooms are easy to dry. Though there are different ways of drying mushrooms I sliced most of mine thinly with a very sharp knife and laid them out to dry on a board. The oyster mushrooms I tore gently in long tin strips. Depending on the weather (if it was very humid for instance) I sometimes put a fan on the mushrooms or used a clip light to speed the drying process. In the end you want the mushrooms to be cracker dry before you put them up for storage. I know our children's friends thought us fairly insane with mushrooms drying all over the place but for the most part I think they kind of liked it, especially when I make them late night pizza or breakfast pizza with mushrooms and a fried egg on top! They are willing to put up with almost anything for pizza.

Some mushrooms dry and store better than others. Some of the varieties that dried well for me were; Black Trumpets, Chanterelles, Chicken Of The Woods, Hedgehog, Porcini, Yellow Foot, and Oyster mushrooms. Dried mushrooms should be soaked in water to re-hydrate them. Some mushrooms need to soak longer than others. Save the water that you soak the mushrooms in, never throw it away, it is like flavor gold! Once the mushrooms have plumped up from the water, Gently spoon them out of liquid and give them a rinse. Set them aside for your recipe. Put the remaining mushroom liquid through a sieve to get any bits out of it. You can use that liquid to flavor soups and broths. Dried mushrooms can also be pulverized in a food processor in order  to make a powder to use in soups and stews and other recipes. I recently made a gin drink with wild ginger syrup and used a mushroom salt for a little flavor on top. I am already fanaticizing about next mushroom season! In the meantime I am going to invent some new ways to use all these dried beauties.

When the mushrooms are cracker dry, I put them up in sealed weck jars for storage.

 A good source for wild mushrooms on line is wildgourmetfood.com

Recipes to come!


to see a gallery of wild mushrooms click here

 Copyright ©2011/ 2012 Andrea Gentl all rights reserved 


Saturday
Dec242011

where the wild things are no. 7. the colors of winter. a photo essay for kinfolk magazine.

I just received Kinfolk Volume Two. It is full of beautiful words and images created by over 60 artists and writers. Below is a photo essay we shot inspired by wildcrafting and the colors of winter. When I get upstate tomorrow, I am going to brew myself some tea, curl up by the fire and savor it cover to cover. Now, let it snow!!!

 To order Kinfolk Volume two click here and then run to your mail box everyday to see if it has arrived!


Prop styling by the lovely Angharad Bailey.

To see outtakes and an extended story click here.

All photos copyright Gentl and Hyers 2011.