Thursday
May302013

goodbye spring. hello summer.


Life is flying by at light speed these days. I am already feeling spring rolling into summer. What is with this crazy weather? My head is chaotic swirl of work and kid schedules. I am trying to eek out some time to just chill. The heady smell of these Lily Of The Valley, one of my favorite flowers, remind me now and then to just breathe and to take a moment to pause and appreciate.

xx


Tuesday
May282013

chive blossom vinegar.


I feel a little silly posting this, as there is almost nothing to this recipe. In fact it is not much of a recipe at all.

I posted the above photos on instagram yesterday of the chive blossom vinegar I was making. We seem to always have an abundance of Chive Blossoms upstate; in fact most people who grow chives tend to get over run with them! My stepmother was an avid gardener and her herb garden was her pride and joy. This is where I first leaned about Summer Savory and Lovage and all those off beat herbs. At any given time in the summer she would be making up batches of herbed vinegars, which she sold in the winter at craft fairs or gave to friends during the holidays. I guess I take all this craftiness for granted having grown up with it. There was a moment in the eighties when artisan vinegars were all the rage. Chive blossom was no exception. It was always my favorite because of its beautiful pink color. So her is my non-recipe recipe.

; )


Clip Chive Blossoms from the chives just below the head of the chive.

Wash the chive blossoms in cold water and pat dry

Fill any jar approx 1/3 to 1/2 full of blossoms depending on how much vinegar you are making and set aside

You will want to use a glass lidded canning jar so the vinegar will not come in contact with any metal. If you are unable to find glass lidded jars place some doubled up cheesecloth or wax paper between the lid and the jar while screwing it shut.

Weck jars or Le Parfait Super jars work well. You can also order nice jars from Williams Sonoma Agrarian.


Heat the appropriate amount of white vinegar in a non-reactive pot to fill your jar. Keep the flame on med low.

Once the vinegar is heated pour it into the jar and over the chive blossoms.

Let the blossoms rest and infuse the vinegar for about a week in a cool dark pantry or cupboard.

The vinegar will turn a pretty pink over night but leave the blossoms in for about a week to a month. 

We had a root cellar and a pantry in our old house and all vinegars and canned goods went in there for the duration, sometimes a month or so would pass before we got around to straining out the chives but all was well. 

As long as it is cool and dark it should not be a problem if you forget about it for a bit.

 After you strain your blossoms out your vinegar will have a lovely chive flavor.

Pull it out in the middle of winter and start dreaming of summer!

Discard the blossoms and Store your vinegar.

There you have it!


If you want you can experiment with white wine vinegar or apple cider vinegar or some Japanese vinegars; they will all work but the plain old distilled white vinegar will have the prettiest color.

xx

Here are a few links to other chive blossom vinegar posts.

http://food52.com/blog/3592-in-full-bloom-chive-blossom-vinegar

http://leitesculinaria.com/80938/recipes-chive-blossom-vinegar.html

http://www.foodinjars.com/2012/05/recipe-reminder-chive-blossom-vinegar/


 Above photos iphone5


andrea gentl | Comments Off | Share Article

tagged artisan vinegars, chive blossom vinegar, summer in spring, summer


Tuesday
May282013

where the wild things are. poached egg with garlic mustard.


This past weekend a group of friends and I went on a "wild walk" on our friend Carver's land in Bovina in upstate New York. Carver and his wife Sonya own The Pines restaurant in Gowanus and are interested in seasonal local foods both wild and otherwise. We were lucky to have local Marguerite Uhlmann-Bower as our guide. She is wealth of knowledge when it comes to wild plants. We set out on an incredibly cold and rainy morning after a super delicious brunch (we were more than a little sad to leave the roaring fire) and roamed both pasture and woods. Before we even got out of the yard proper, we had spotted garlic mustard. Garlic Mustard from what I have read was brought to the United States in the 1860's as a culinary herb but escaped into the wild and is now an invasive plant. You will see this early flowering wild plant along roadsides in the spring, it has delicate vibrant green leaves that are heart shaped and toothy with  tiny white flowers. It does not have any poisonous look a likes. You will know this plant at once when you rub the leaves; it gives off a garlic odor. The leaves and the flowers are bitter but very delicious. Garlic mustard can be used in pesto or a salsa verde or raw in salads. All parts of the plant are edible and the roots apparently taste like horseradish.


When I got back home I searched our property for Garlic Mustard and found it literally two feet from my back door!

The next morning we decided to try it out for breakfast.

 I blanched the greens and served a poached egg over them. 

I have seen farmers selling Garlic Mustard at the Green Market in Union Square.  However, if you can't find any just substitute any bitter green in this recipe. You can't go wrong with eggs and greens.

I will post more on our walk soon.

xx


Poached Eggs with Garlic Mustard

2 farm fresh eggs

1/2 pound of Garlic Mustard with flowers or a similar bitter green (Dandelions would be just as good)

4 tablespoons of olive oil

 Cracked black pepper to taste

Sea salt to taste


Wash the garlic mustard and remove the leaves and flowers from the stems

Discard the Stems

Set the flowers aside

In pot of rapidly boiling water blanch the Garlic Mustard leaves for 10 seconds or so, just long enough for them to soften and turn a beautiful vibrant green.

Remove the Leaves from the water with a slotted spoon and divide between to plates.

Drizzle the greens with a bit of extra virgin olive oil.

In the remaining boiling water crack two eggs and poach. 

When the eggs are one slide one each with a slotted spoon from the pot to the plates.

Drizzle with a bit more olive oil

Top with cracked black pepper and Sea Salt

Add the delicate Garlic Mustard flowers on top.

Serve with tow slices of toast. I used walnut raisin bread because that is what I had around. (Thank you Paola!)

I rubbed the toasts with garlic after toasting.

Sunday
May192013

where the wild things are. ramp bloody mary.


It has been one of those weeks. I am really looking forward to chilling inside today on this rainy rainy Sunday.

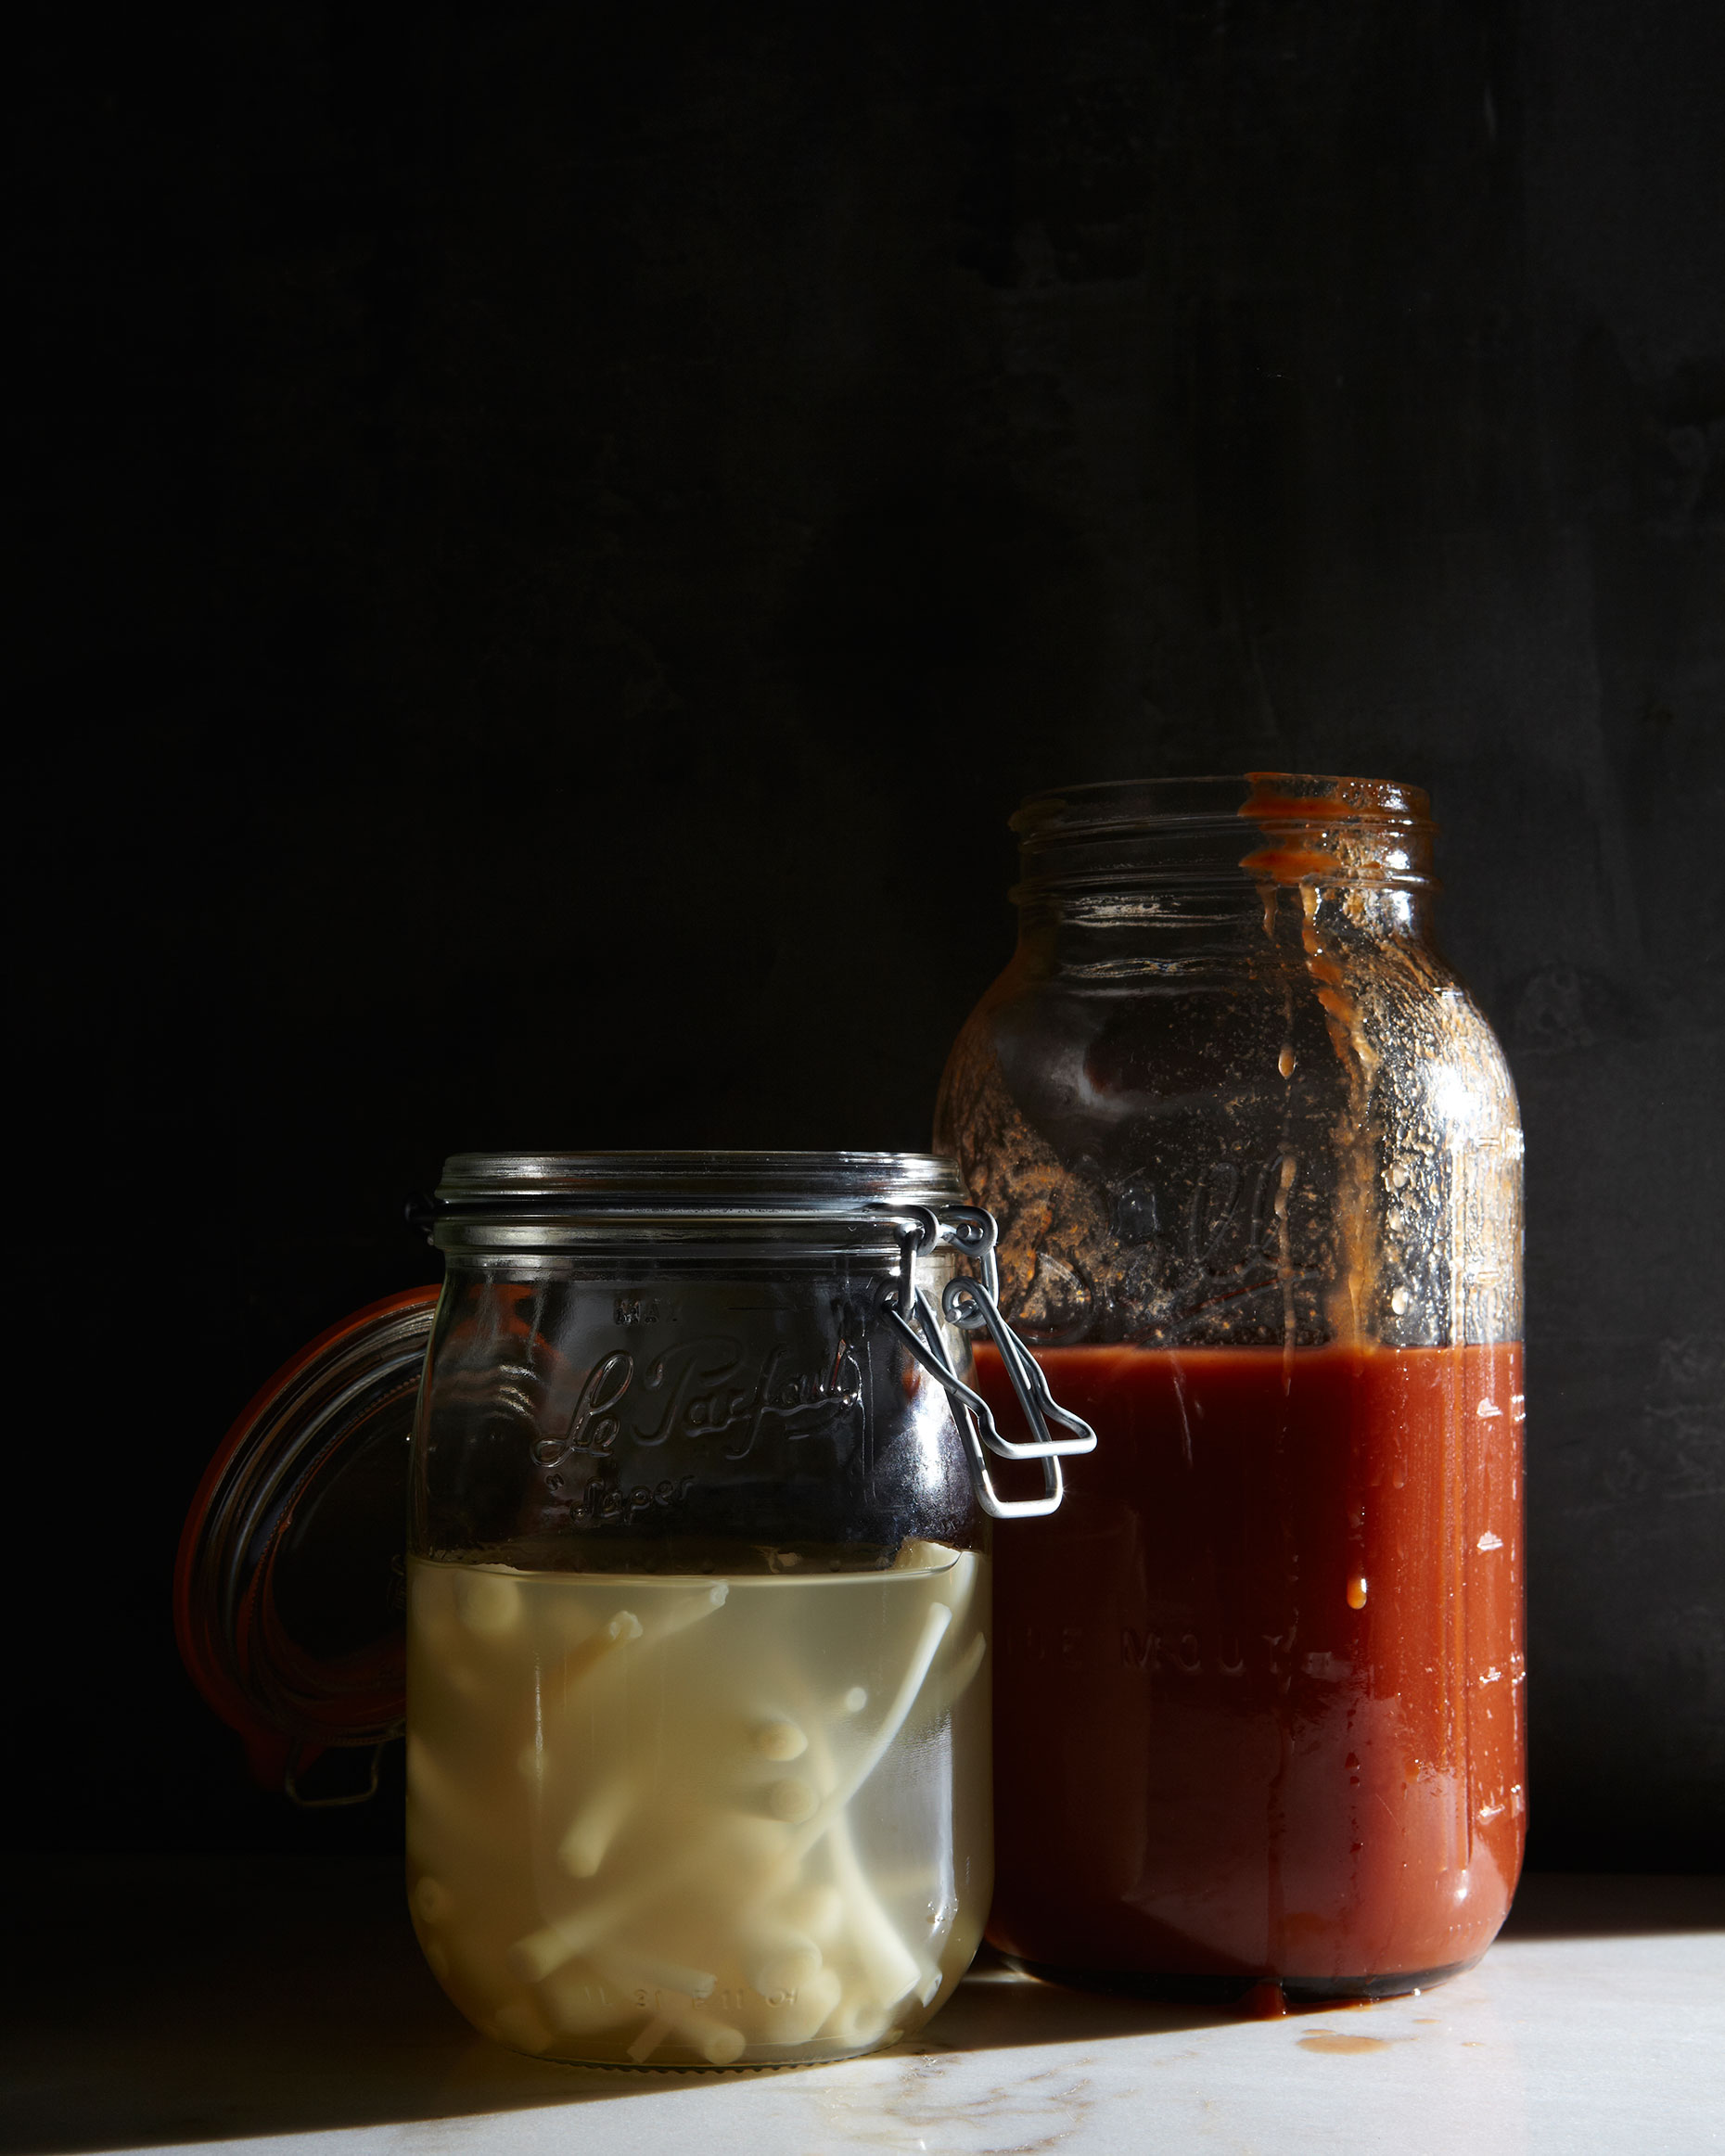
My bed and a good book is calling me. Today is kind of perfect for this spicy Ramp Bloody Mary. You might want to brew up a batch of this ramp infused vodka while you can still get your hands on some ramps. It is super easy and great way to have ramps throughout the year, that is if you don’t get too addicted and drink it all too fast!

Take a fifth of good vodka. 

Pour it into a large mason jar (I used a Le Parfait Super)

Trim and clean between fifteen and twenty ramps. 

Remove the greens to use for something else.

Place the ramp bulbs and stems in the vodka and store in your fridge from 3 months to one year.

I left mine for a year but after three months they were fairly infused. It is up to you how long you leave them.

Mine started to break down after one year and I eventually strained them out.

Infusing can happen rather quickly but I tend to push it's limits. Check the vodka from time to time to see when you like the taste of it best.


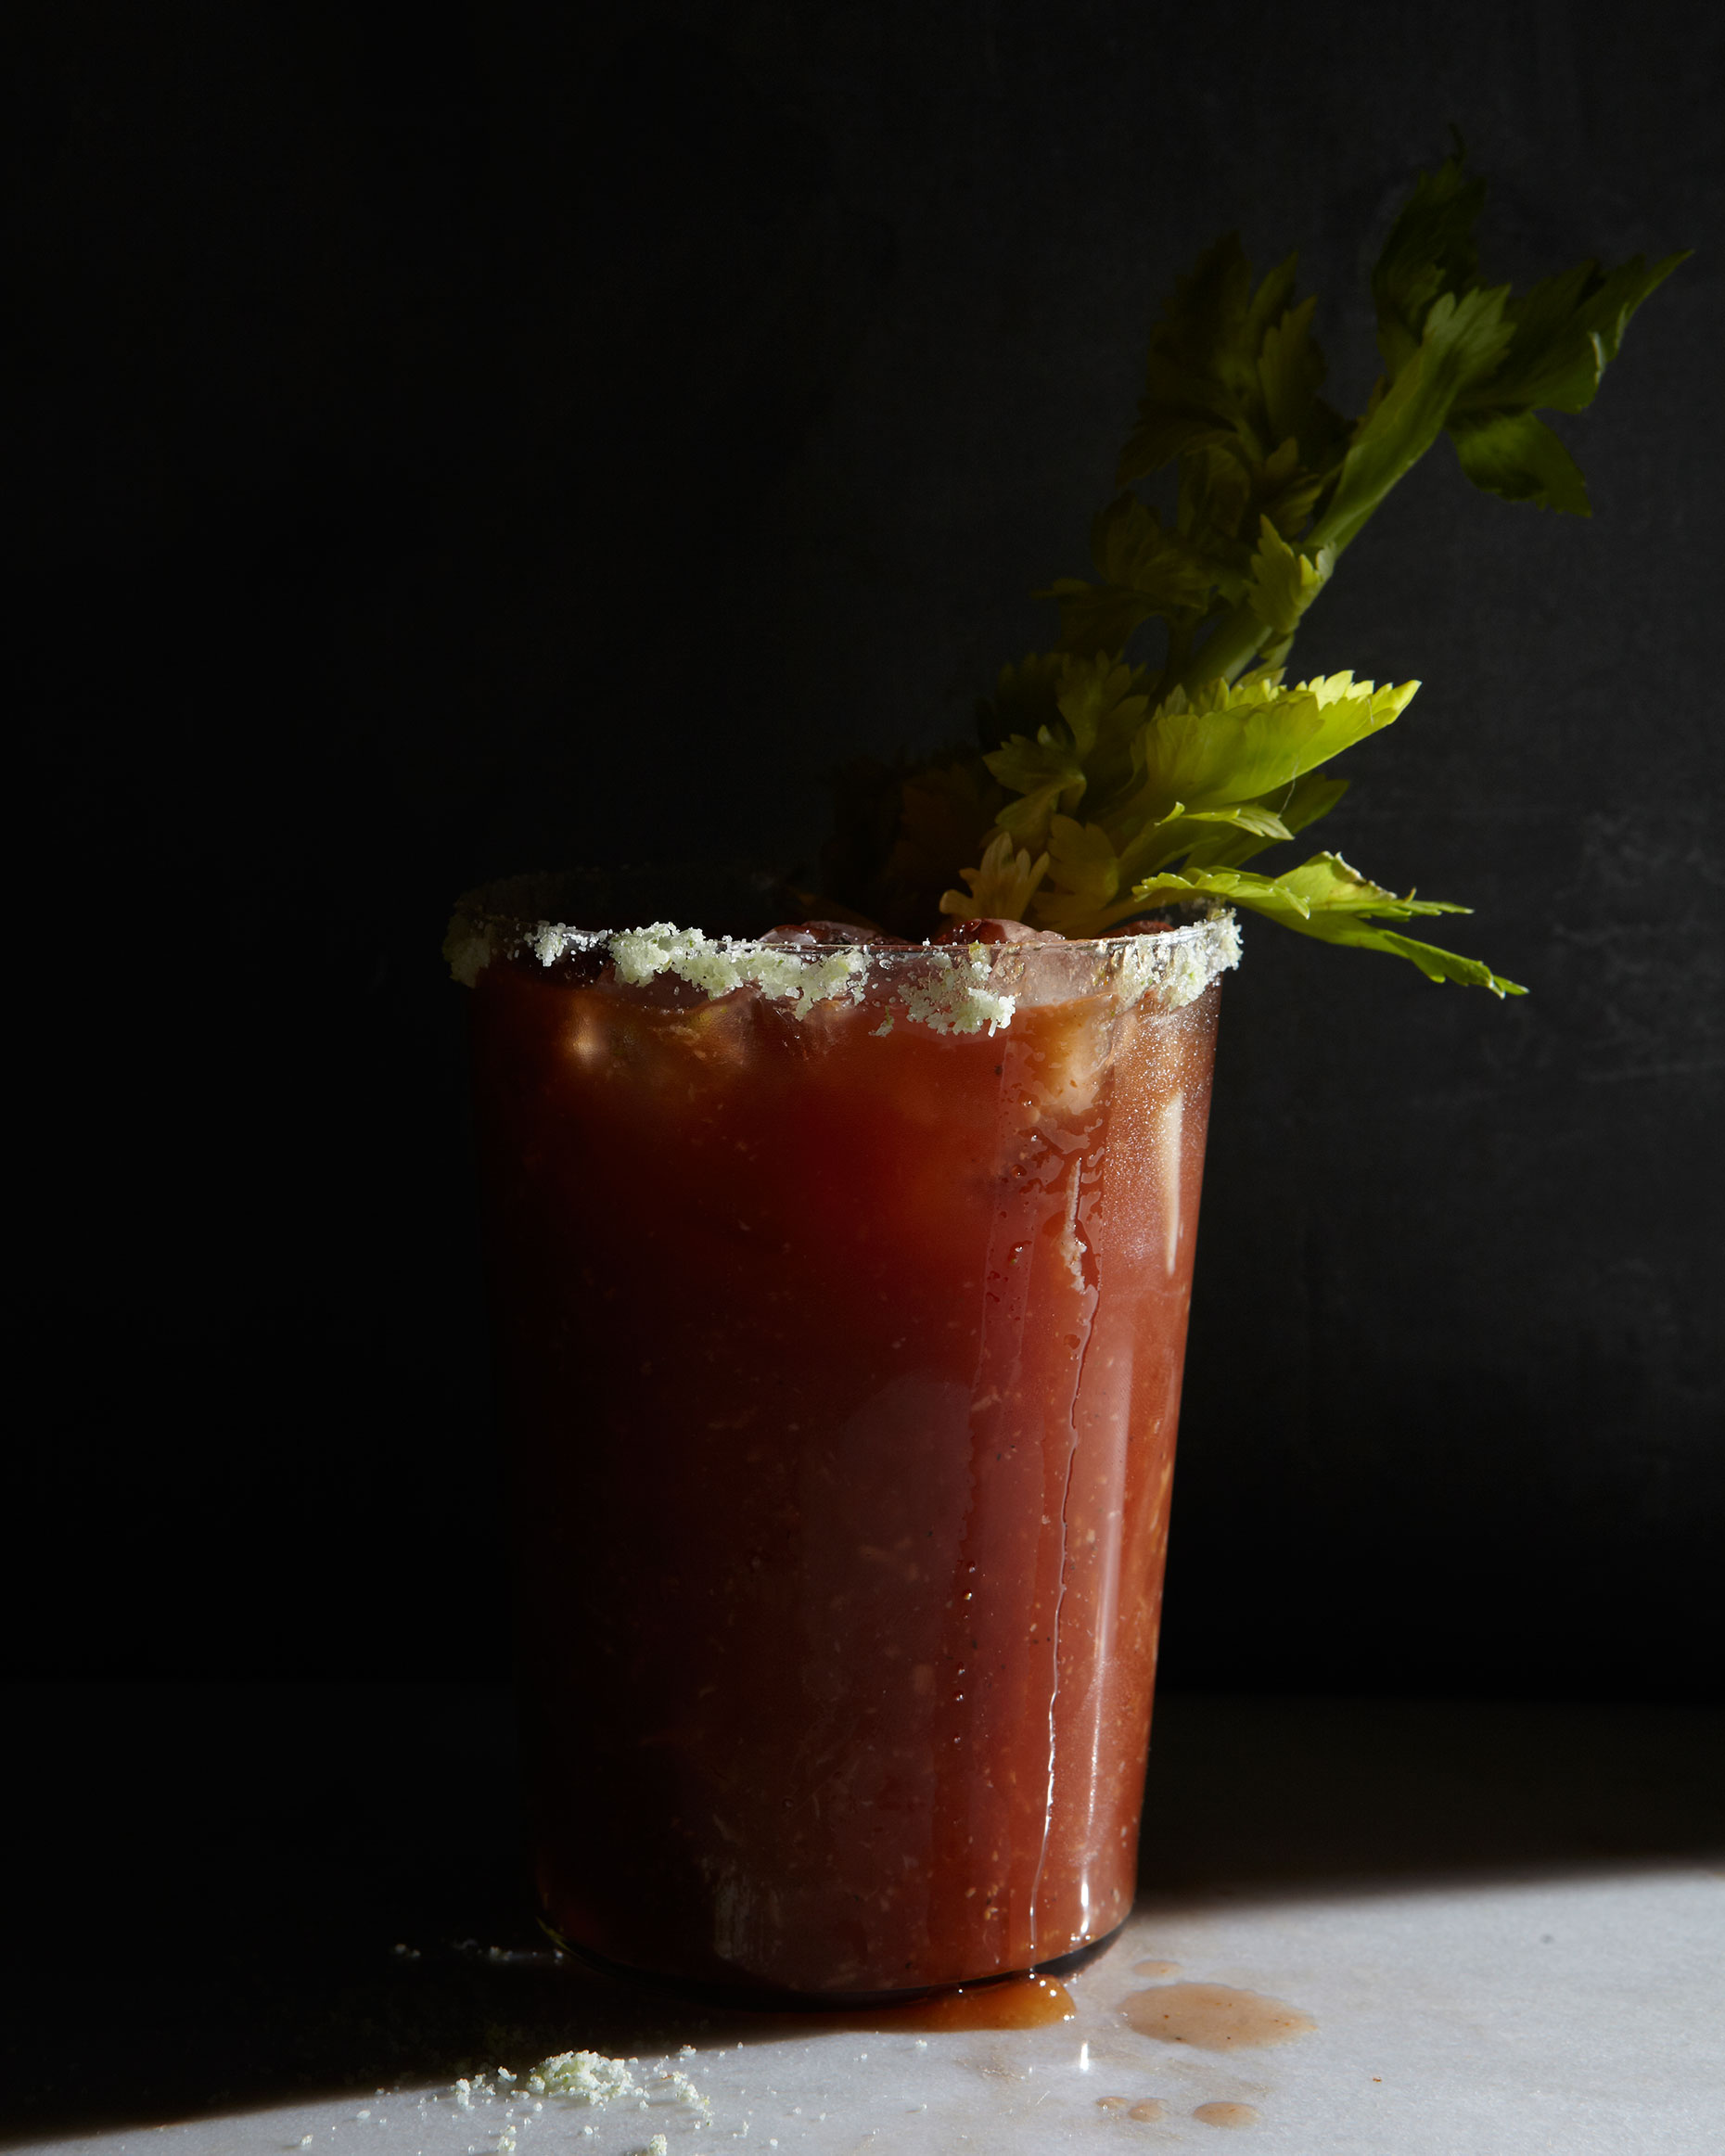
This Bloody Mary is rather spicy and full of horseradish. I like it that way but you can obviously tweak the spices to your liking.

I add crushed juniper to mine as well to give it a woodsy piney taste.

Enjoy!!


 Bloody Ramp


In a an extra large Mason Jar Mix:

3 ounces vodka ramp vodka

10 ounces tomato juice 

Juice of 1 lemon

1 teaspoon Worcestershire sauce

4 drops Tabasco sauce

1/4 teaspoon coarse black pepper

1/4 teaspoon sea salt

1/4 teaspoon homemade celery salt

3 tablespoon fresh grated horseradish 

Shake and Chill the bloody Mary mix

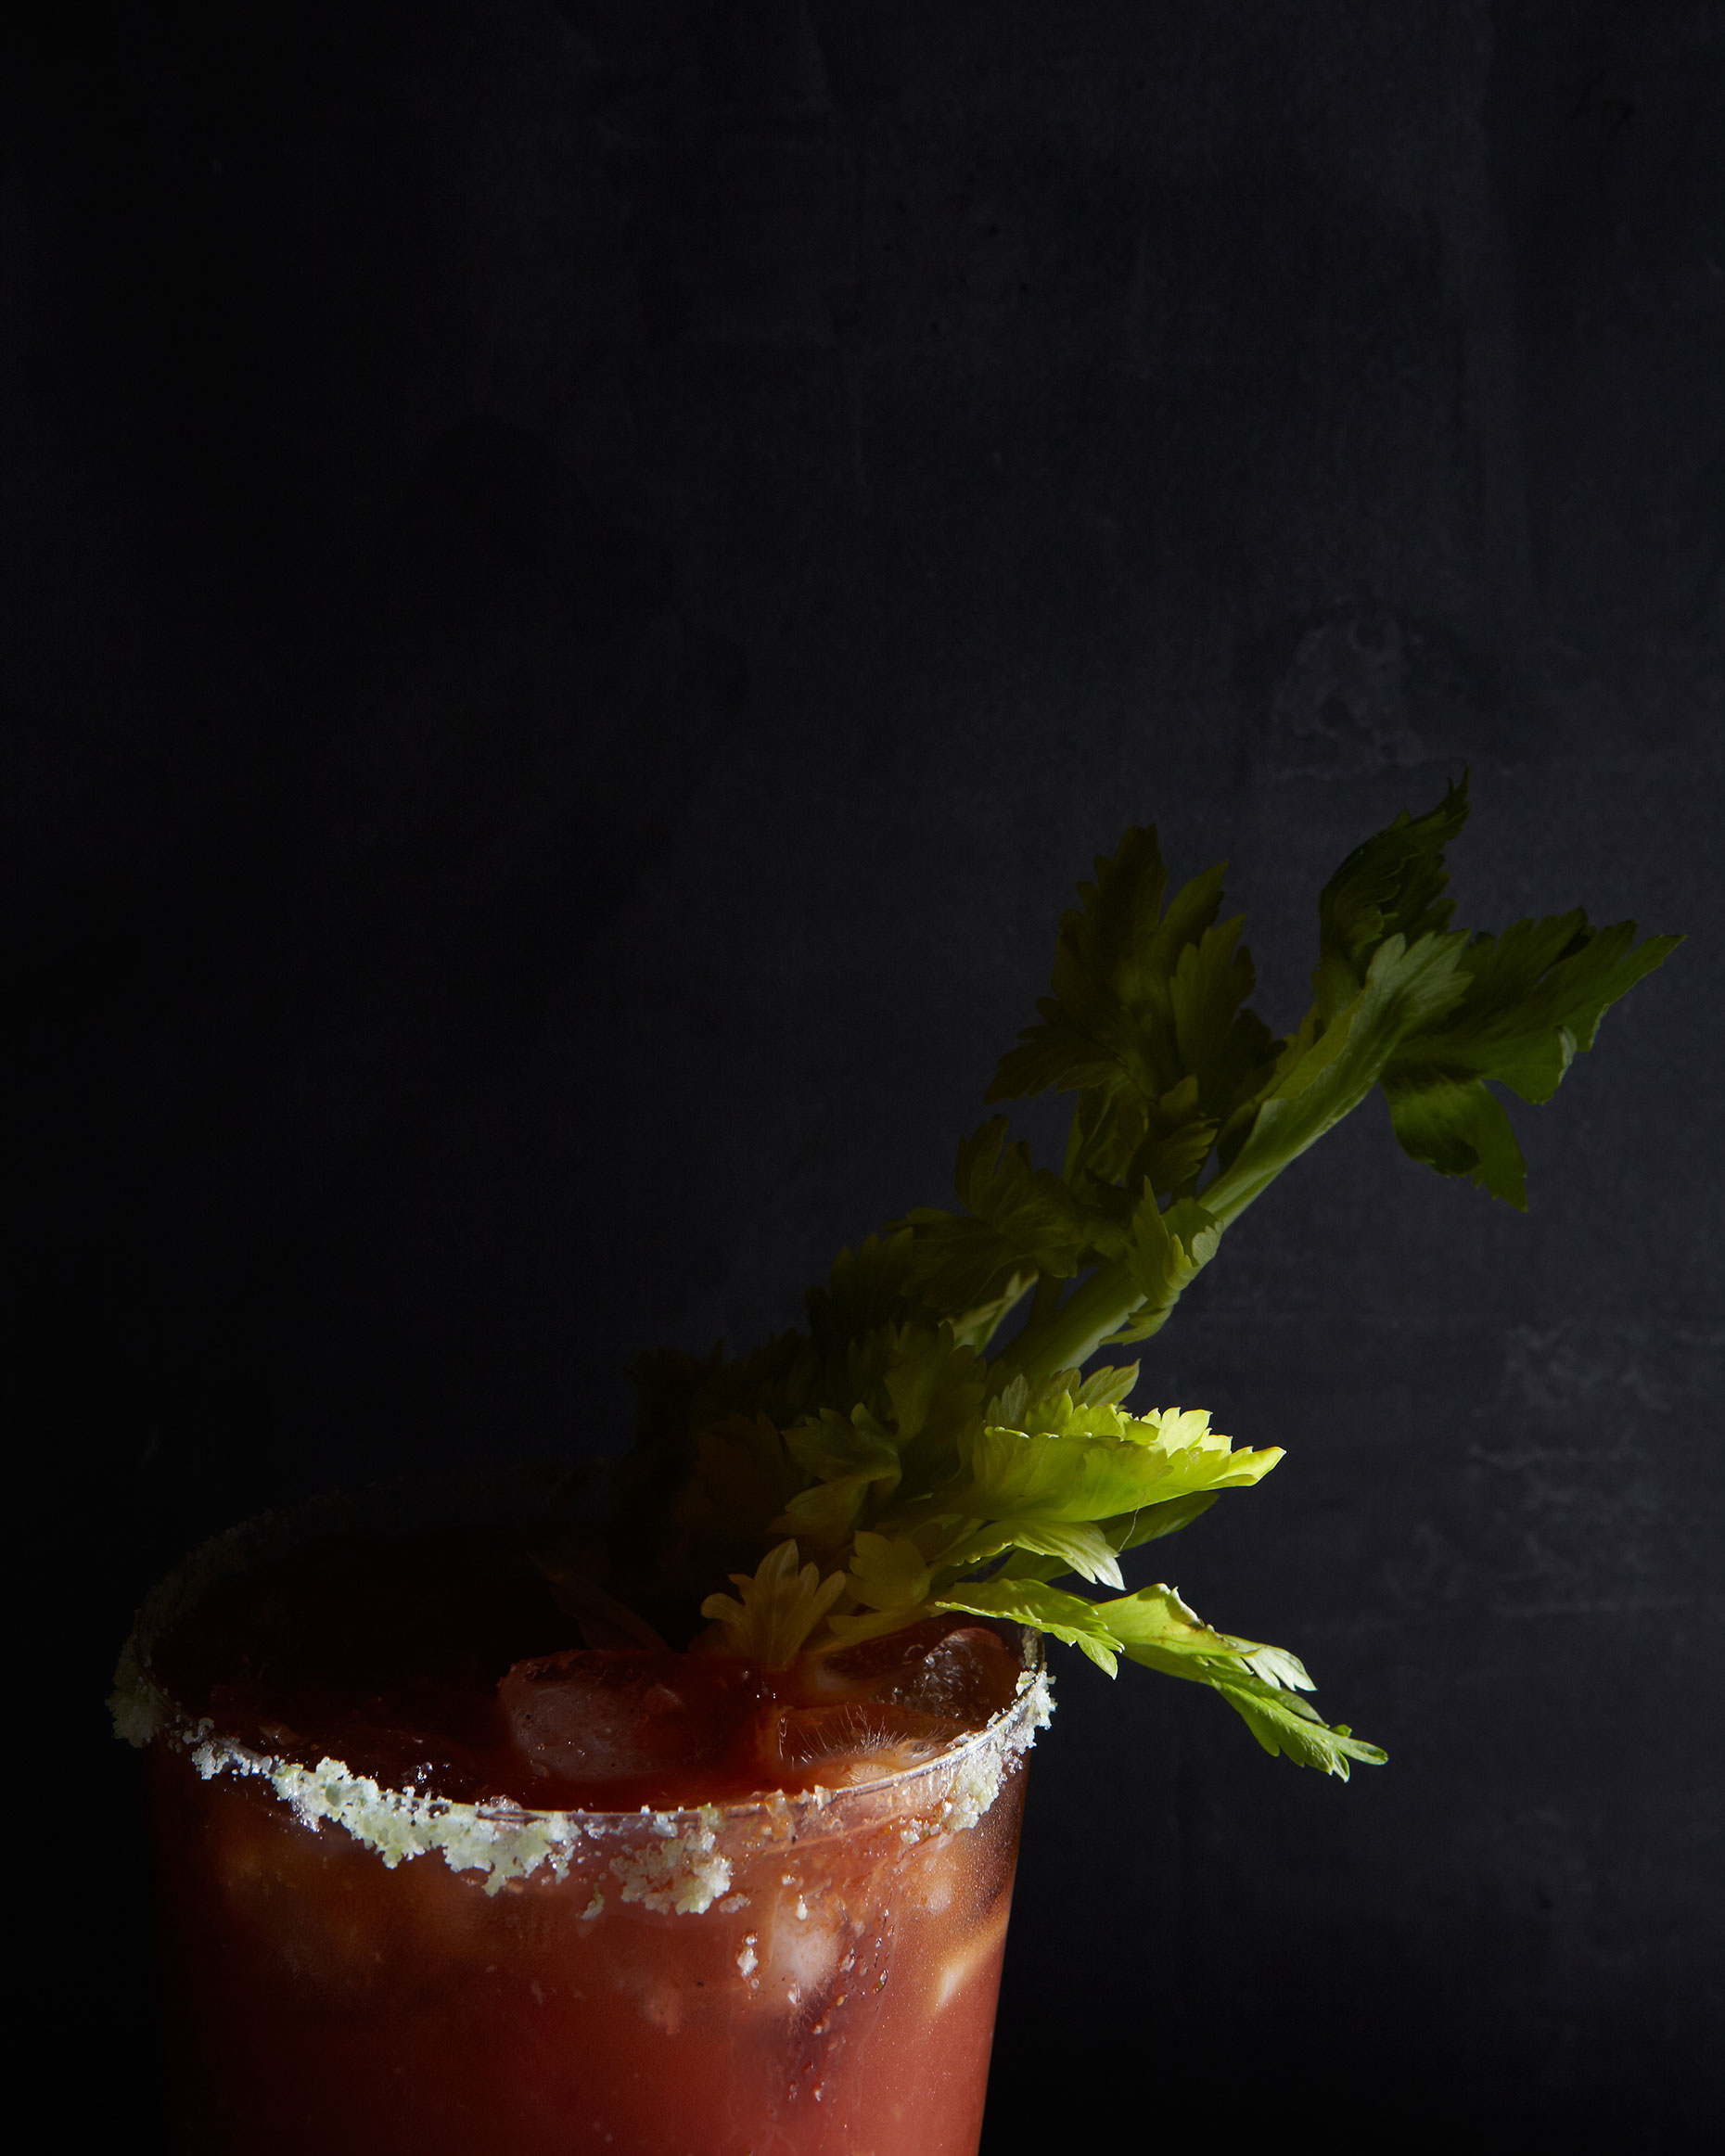
When The Bloody Mary mixture is good and cold; Rim the glass with homemade celery salt

Pour the mixture over crushed ice and serve

Serves two.


Garnish with pickled ramps or a crisp celery stalk.


See this post from last year for Juniper Pickled Ramps.


Celery Salt

10 fresh green celery leaves

1/4 cup sea salt. I like grey.

Combine the sea salt and the Celery leaves in a mortar and pestle and blend together until you have a fine green salt.

It may be a little wet.

You can set it out on a baking sheet to dry and then store it in airtight jar in a darkened place like a pantry or stick the jar in the freezer to store it.

The green color will slowly fade over time.


Saturday
May182013

where the wild things are.bucatini with hen of the woods and ramp butter.


I am extending the ramp season a bit with more with a few more posts. Sorry guys! On our side of the mountain the ramp is late compared to some lower zones.

I made pasta I wanted to share that is so simple. You can substitute the ramp butter for any other compound butter you feel like making. I imagine nettle or spring garlic or mixed herbs would be quite nice as well.

I used Hen Of The Woods mushrooms but you can substitute any other kind. Maitake or Shitakes would be just as good.


Bucatini With Hen Of The Woods And Ramp Butter.

Serves two

1/2-pound pasta

1/2 pound of Hen of The Woods 

3 inch long piece of old stale baguette or other bread

Olive oil

Salt + Pepper

Pecorino Romano


Set your pasta water to boil. When boiling generously salt it.

Start your Bucatini. It will take roughly 11 minutes or so and in the meantime if you have everything prepped you can cook the mushrooms and the breadcrumbs.

In a cast iron skillet or low sauté pan. Cover the bottom with a good olive oil.

Heat the olive oil on low-medium heat.

When hot drop your cleaned dry Hen Of the Woods into the olive oil and cook until some are just crispy.

Remove them from the olive oil and set in a dish to the side.


Chop your stale bread into small breadcrumbs. Drop them into the olive oil and cook for a minute or two. They will begin to brown and absorb most of the olive oil.

Add a Pinch of salt to the breadcrumbs.

Add a good dollop of Ramp butter and just melt it into the breadcrumbs.

Add the mushrooms and turn off the heat.


By this time your pasta should be done.

Before draining it reserve a cup or so of the pasta water. Set it to the side.

Drain you pasta and toss it into the mushroom ramp butter and bread crumb mixture.

Turn the heat on low and add about 1/2 cup of the pasta water to the mixture.

You will want to toss the pasta until all the ingredients are combined and everything is hot. 

Add the rest of the pasta water if you need it.

Season with salt and fresh cracked black pepper and generously grate

xx